
This is eXposer's main window, also called the x-sheet window:
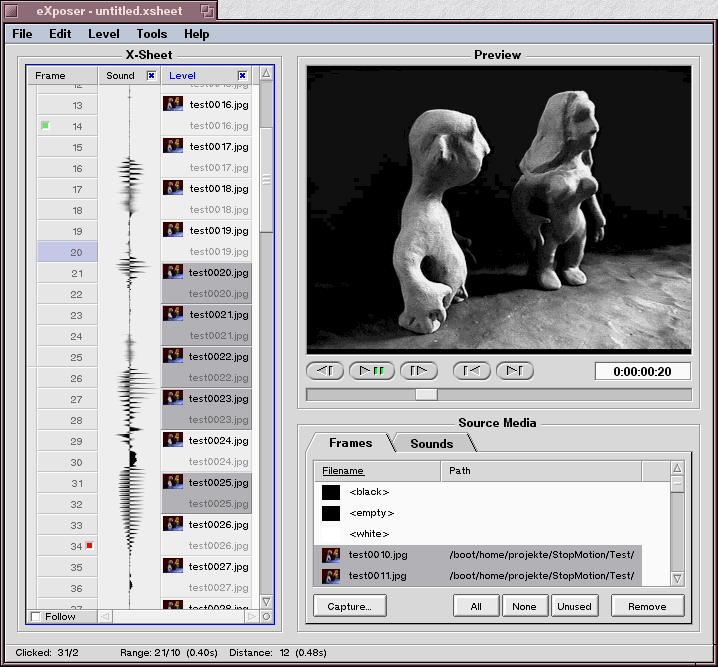
As you can see, this window is split into three areas. The X-Sheet, the Preview and the Source Media container.
Source Media
The purpose of the Source Media part is to hold all frames or pieces of sounds, that your animation is made up of. If you want one frame of animation to appear at different times in your animation, you need to load it only once into the Source Media container. In the X-Sheet can have as many references to the same single source item as you like.
The container is composed of a list and a row of buttons. You can drag'n'drop files from the Tracker (the BeOS counterpart of the Windows Explorer or the MacOS Finder) into these lists. eXposer will try to load the files you have dropped and sort them into the list according to their type. Any image file, for which you have a Translator can be loaded, as well es any sound contained in a media file for which your system has a Media Add-On. Besides WAVE, AIFF or MP3, this includes soundtracks from movie files such as QuickTime or AVI. When eXposer loads images, they will be stored in the computers main memory, after having been converted to the size of the preview and 16 shades of grey. They will also be compressed in order to use even less memory. This is necessary, so that eXposer wont drop frames because of a slow harddrive, especially when using many levels of animation. Soundtracks are played back directly from disk.
The special items, that are present in an otherwise empty list, are place holders for the x-sheet. Since you cannot place items at an offset from the beginning of your x-sheet, you can use one of these items to do just that. The empty item is fully transparent, but it will produce a black frame if no other frame in another level is next to it.
The buttons have the following meaning:
Capture |
(Frames page) starts the capture module. All frames captured will automatically be loaded into the x-sheet that you started capturing from. |
|
Record |
(Sounds page) launches SoundRecorder, a BeOS sound recorder which comes preinstalled on every BeOS installation. For documentation on SoundRecorder, refer to this page of the BeOS User Guide. |
|
All |
selects all items in the list except the special items black, empty, white and silence. |
|
None |
deselects all items. |
|
Unused |
selects all items, which have not yet been inserted into the x-sheet. Usefull if you just captured some frames and want to find them quickly. |
|
Remove |
removes the currently selected items. If some items are being used in the x-sheet, you will be promted for an affirmation. |
X-Sheet
The x-sheet works like a table, where you store references to your loaded source media items. Currently, two types of source media are supported: Frames of animation and sound, for which the x-sheet has two types of Levels. You can drag items from the Source Media containers onto the x-sheet and drop it above the right kind of level. Each x-sheet entry has two properties: Its position and its duration (in frames). All actions you can undertake in the x-sheet influence either one of these properties. To guarantee a speedy workflow, all direct actions can be performed by only one mouse click.
The left mouse button serves multiple purposes that depend on the area where you clicked: If you click inside an item, you will select this item (and deselect any others). If you don't release the button and move your mouse, you initiate drag'n'drop. With drag'n'drop, you can move one or multiple items to a different position in the x-sheet. To select multiple items, simply hold down a modifier key while selecting: To make continuous selections, use the Shift key, for non-continuous selections, hold down the Option key (for IBM compatible computers, that's the Windows key). Note that you can only select items in one level at a time.
Besides selecting and dragging items, the left mouse button is also for changing the duration of items (resizing). To resize an item, simply click between two items and start dragging. The cursor will also change to up and down arrows to indicate the expectation of resizing.
To speed this up, you can use the right mouse button. The right mouse button starts the resizing mode no matter where you clicked an item. This is also usefull when the edge of the item that you want to resize is outside the visible portion of the x-sheet. Changing the duration of one item moves all items behind that item. Sometimes, it is desirable to only affect the item after the resized item, without changing the positions of following items.
The third mouse button (if you have one), is used for resizing an item while only affecting the directly ensueing item. This will of course change the duration of the item you're resizing as well as the one behind it. If you don't have a third mouse button, you can achieve the same effect by holding down the Control key when you start resizing.
To the left of the levels is the frame bar. It offers you the functionality to set a start and end frame. The animation will be looped inside this range when you play it back. To set the start and end frame, click into the frame bar with your right mouse button. When you click on its left side, you will set the start frame, while clicking on the right will affect the end frame.
When you click into the frame bar with your left mouse button, you set the current frame (blue) to where you clicked. Additionally you can start dragging your mouse, and this will let you scrub through your animation. If the animation was previously playing, you stop the regular playback by clicking into the frame bar with your left mouse button.
At the bottom of the frame bar, you see a checkbox Follow. Turn follow mode on to have the x-sheet scroll with the current frame while the animation plays back. If you don't have follow mode on, and you stop playback, you can switch it on and off to quickly scroll the x-sheet to the position where playback stopped.
Each Level has a clickable title. You can select a level by clicking it. The actions available in the Level menu are applied to the selected (darker) level. Additionally, you can turn levels on or off with the little check mark. Double clicking a level selects all items in that level.
Keyboard navigation is also available for the X-Sheet. It needs to be in focus of key events for this to work, which is indicated by a blue frame. The cursor keys will navigate a blue cursor through the x-sheet. This cursor is always in between two items. If you hold down Shift while moving the cursor, items will be added to the selection that the cursor passes over.
Other keys:
Space bar |
toggles playback. |
0 - 9 |
sets the duration of selected items to that of the number pressed. 0 = 10 |
+ / - |
increases or decreases the duration of the selected items. |
s / e |
moves the cursor to the start or end frame. |
Home / End |
moves the cursor to the beginning or end of a level. |
Page Up / Page Down |
scrolls the x-sheet about the visible region up or down. |
Return |
Sets the current frame to where the cursor is. |
o |
activates the level in which the cursor is. |
Delete / Backspace |
remove the selected items |
Preview
Here you can view your animation at the desired frame rate and resolution. You can set these parameters in the settings window. The transport buttons toggle playback and direction. (You can play your animation backwards.) The other two buttons are for stepping through the animation frame by frame. The slider is for scrubbing through the animation. This differs from the functionality of the x-sheet frame bar in that it is limited to the region between the start and end frame. You can toggle the little time display between time and frame number by clicking into it.
The Preview also supports keyboard control. The following keys will work:
Space bar |
toggles playback. |
Cursor up |
plays backwards. |
Cursor down |
plays forward. |
Cursor left |
steps one frame back. Hold the key to continue stepping through the animation. |
Cursor right |
steps one frame forwards. Hold down the key to continue stepping. |
Menus
It follows is a description of every entry in the menu bar:
File |
|
New X-Sheet |
opens an empty new x-sheet window. |
Open... |
prompts you for a previously saved x-sheet and loads it into a new window. |
Save As... |
Presents you with a file requester where you supply the filename and location in your file system for your x-sheet. |
Save |
Saves the x-sheet under it's previously given name and overwrites the last version on disk. If you didn't save your x-sheet yet, it acts just like the previous item. |
Render As... |
will output the animation as AVI or Quicktime movie. This depends on the settings made in the Render Settings dialog |
Render |
re-renders the animation and overwrites the movie file on disk. If you didn't render yet, it will work just like Render As... |
Render Settings... |
opens a dialog, where you can globally define the render format of the movie files. |
About... |
shows you some info on who to blame if something goes wrong. |
Quit |
exits this x-sheet. If it was the last one, the program is terminated. |
Edit |
|
Undo |
undoes the last action. Undo works all the way to when you first started or loaded this x-sheet. It doesn't matter if you saved it meanwhile. |
Redo |
redoes the last undone action. Once you perform a new command after you've undone some other, you lose the actions in the redo buffer. |
Select All |
selects all items in the active level. Active either means the one with some other items already selected, or the blue one with the cursor. |
Select None |
clears the entire selection. |
Invert Selection |
inverts the selection of items. All items in a level that haven't been selected will be selected now and the ones that were selected before will be deselected. |
Cut |
removes the selected items from the x-sheet into the clipboard. |
Copy |
copies the selected items into the clipboard. |
Paste |
puts the items from the clipboard into the level where the cursor is. This works only if the type of data in the clipboard matches the type of level (sound or image). |
Clear |
removes the selected items. They're still in the list of loaded source files. |
Settings... |
opens the settings for this x-sheet. |
Level |
|
New Image Level |
creates a new level which is able to contain frames of animation. |
New Sound Level |
creates a new level which is able to contain chunks of sound. |
Rename... |
promts you for a new name for the selected (darker) level. |
Remove |
removes the selected (darker) level. |
Tools |
|
Change Duration... |
opens a tool window, where you can adjust the duration of the selected items in a neat way: You have two things: a value and a mode. The mode determines in which way the value will be applied to the duration of the particular item. Each selected item will be treated individually. The Set to mode replaces the duration of the item with the value. Add to adds the value to the current duration of the item. Subtract - current duration - value = new duration. Multiply by - current duration * value = new duration Well, you get the idea... |
Reverse |
reverses the order of the selected items. Note that it doesn't care if the selection of items is continuous or not. This allows for interesting effects if you wish so. |
Sort |
sorts the selected items in alphabetical order. |
Help |
|
Index |
opens the documentation of eXposer. |
Send Feedback |
opens a blank email to us, the creators of eXposer. There is only two of us, no middle man ;-). As you might have guessed, we love feedback. So if there is a problem, or you want to suggest a feature, don't hesitate to make use of the Send Feedback menu entry... Even if you just want to tell us what a great job we've done. :-) |
Bubble Help |
is turned off by default, but turn it on to find out all about the features while working with the program rightaway. Just rest your mouse on a control you're uncertain about and it will tell you what it does. |